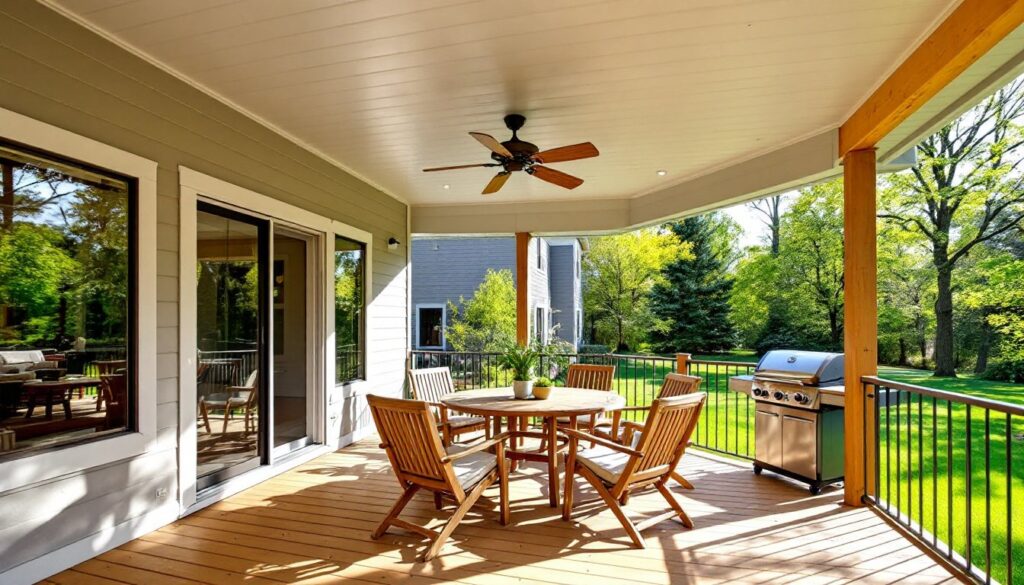
A covered deck attached to a house adds functional living space that bridges the gap between indoors and out, especially when rain threatens to cancel dinner plans. Unlike an open deck that’s at the mercy of weather, a roof overhead turns outdoor square footage into year-round usable space without the cost or complexity of a full room addition. But building one involves more than screwing down decking boards and propping up a few posts. Attaching structure to an existing home means dealing with flashing, ledger boards, proper pitch for runoff, and local building codes that treat covered decks more like additions than simple platforms. This guide walks through the design choices, permitting realities, and construction considerations that separate a solid project from a sagging mess.
Table of Contents
ToggleKey Takeaways
- A covered deck attached to a house transforms outdoor space into year-round usable living area that protects furniture and extends entertaining seasons without the cost of a full room addition.
- Proper ledger board attachment using ½-inch bolts every 16 inches into house framing, combined with step flashing and waterproof underlayment, is critical to prevent water damage and structural failure.
- Design a covered deck with at least 8–9 feet of headroom under beams, minimum roof pitch of 3:12 for asphalt shingles, and footings extending below the frost line (36–48 inches in cold climates) to ensure durability.
- Most jurisdictions require a building permit for covered decks due to roof loads and house attachment, with inspection of ledger bolts, flashing, footing depth, and beam sizing; larger projects may need an engineer’s stamp.
- A contractor-built covered deck costs $50–$90 per square foot ($10,000–$18,000 for 200 square feet), while DIY materials run $25–$45 per square foot; hiring professionals for framing and roofing while handling finishing work is a cost-effective middle approach.
- Working at height during roofing and the risk of injuries to helpers make liability insurance and professional assistance for structural and roof work critical safety considerations.
Why Add a Covered Deck to Your Home
A roof over the deck transforms how homeowners use outdoor space. It protects furniture from sun fade and mildew, extends grilling season into spring and fall, and creates a dry entry zone that reduces mud and water tracked indoors. In regions with intense summer sun or frequent afternoon storms, covered decks see far more daily use than open platforms.
From a property value standpoint, covered decks occupy a middle ground. They add livable square footage without the expense of conditioned space, no HVAC ducts, insulation, or drywall. Appraisers typically recognize them as functional improvements, though they don’t command the same per-square-foot value as interior renovations. The return on investment depends heavily on climate: in the South and Pacific Northwest, where outdoor living is part of the culture, buyers actively seek covered outdoor spaces. In snow-heavy areas, the value proposition drops unless the structure is engineered for significant snow load.
There’s also a practical middle step between raw exposure and full enclosure. Homeowners who later want screens or removable panels have an easier time retrofitting a covered deck than adding a roof to an existing open one. The posts and beams are already in place, and electrical rough-in can be planned during initial construction.
Planning Your Covered Deck Design
Choosing the Right Size and Layout
Deck size should be driven by intended use, not arbitrary square footage goals. A dining table for six needs roughly 10×12 feet of clear space: add a seating area or grill zone, and the footprint grows to 12×16 feet or larger. Narrow decks under 10 feet wide feel cramped once furniture and traffic paths are accounted for.
Layout depends on how the deck attaches to the house. Decks parallel to the home’s rear wall are simpler to frame and flash, since the ledger board runs along a single wall plane. L-shaped or wrap-around decks require more complex beam configurations and multiple flashing details, doable, but not a first-time project. Check door swing clearances: an outward-opening door needs at least 36 inches of landing space per International Residential Code (IRC) requirements.
Roof height matters more than most homeowners anticipate. A covered deck with only 7 feet of clearance under the beams feels claustrophobic and limits ceiling fan options. Aim for 8 to 9 feet of headroom under the lowest beam. That height keeps the roofline below most second-story windows while providing comfortable clearance. If the deck roof ties into existing eaves, work backward from that attachment point to determine post height and beam placement.
Selecting Roofing Styles and Materials
The roof style affects both aesthetics and construction complexity. A shed roof (single-plane slope) is the simplest: it attaches to the house with a ledger at the high side and slopes away for drainage. Minimum pitch is typically 3:12 (3 inches of vertical rise per 12 inches of horizontal run) for asphalt shingles: metal roofing can go as low as 1:12 with proper underlayment and seam sealing. Shed roofs work well when the deck sits below a blank wall section or where upper-story windows aren’t an issue.
Gable roofs create a more finished appearance and better ventilation, but they require ridge beams, opposing rafters, and more intricate flashing where the roof meets the house sidewall. Framing a gable structure involves cutting compound angles and sistering rafters to a ridge board, manageable for experienced DIYers, but expect twice the labor of a shed roof.
Material choices balance cost, weight, and longevity. Asphalt shingles are the default for matching existing home roofs: they’re affordable, widely available, and most local roofers are familiar with installation. Expect shingles to last 20-25 years in moderate climates. Corrugated metal panels are lighter, shed snow and leaves easily, and suit modern or farmhouse styles. They’re noisier during rain but require less structural support due to lower weight, important when adding load to an existing house wall. Polycarbonate panels (corrugated or multiwall) let in diffused light while blocking UV: they’re popular for decks that would otherwise be too shaded, though they yellow and become brittle after 10-15 years of sun exposure.
Don’t overlook underlayment and flashing. Any roof attachment to the house requires step flashing or a kick-out diverter to prevent water from running behind siding. Use self-adhering waterproof membrane (like Grace Ice & Water Shield) under the first course of shingles where the roof meets the wall. Skimp here, and you’re inviting rot into the house framing.
Permits, Building Codes, and Structural Requirements
Most jurisdictions classify a covered deck as a structure requiring a building permit, not a simple repair. The roof element triggers this. Attaching any load-bearing structure to the house exterior means inspectors will check ledger board attachment, flashing details, footing depth, beam sizing, and whether the existing wall framing can handle the lateral and vertical loads.
Expect the permit process to take 2 to 6 weeks depending on the municipality. Submitting plans drawn to scale (even a hand sketch with dimensions and beam callouts) speeds things up. Include footing locations, beam span tables, post sizes, and how the ledger attaches. Many building departments require a licensed engineer’s stamp for covered structures over a certain size (often 200 square feet) or when attaching to a second story.
Ledger board attachment is the most scrutinized detail. The ledger, a horizontal board bolted to the house that supports one side of the deck joists, must fasten into solid framing, not just siding or sheathing. Standard practice uses ½-inch lag screws or ½-inch through-bolts every 16 inches, staggered vertically. The ledger needs flashing above it to direct water away from the connection. If the house has engineered I-joists or floor trusses, consult a structural engineer: you can’t simply bolt into the web of an I-joist without reinforcement.
Footings must extend below the frost line, 36 to 48 inches deep in cold climates, to prevent heaving. Deck posts typically bear on concrete piers with embedded post bases, not wood directly on concrete. Post size depends on load and height: for an average covered deck, 6×6 posts are common for corners and heavy load points, 4×4 posts may suffice for intermediate supports on smaller spans. Beam sizing follows span tables in the IRC: a double 2×8 beam can span roughly 8 feet under typical roof loads, while a double 2×10 handles 10 to 12 feet. Using actual lumber dimensions (a 2×8 is really 1.5×7.25 inches) matters when calculating load capacity.
Electrical work, adding outlets or lighting, requires separate permits in most areas and must meet National Electrical Code (NEC) standards. Outdoor receptacles need GFCI protection and weatherproof covers. If the project includes a ceiling fan, the junction box must be fan-rated and properly braced.
DIY vs. Hiring a Contractor: What to Consider
A covered deck sits at the edge of DIY feasibility. The deck platform itself, laying joists, installing decking boards, building stairs, is well within the range of a confident DIYer with a circular saw, drill, and level. Adding the roof changes the equation. Cutting rafters, installing flashing, and ensuring proper load transfer to the house requires carpentry skills and comfort working at height.
Be honest about three factors: time, tools, and help. Framing and roofing a 12×16-foot covered deck is a 3 to 5 weekend project for two people with moderate skills, assuming no major setbacks. That doesn’t include design time, permit wait, or concrete curing. Tool-wise, a miter saw, framing nailer, and post level make the job far easier: doing it all with a circular saw and hammer is possible but slow and frustrating. Roofing work requires safe scaffolding or sturdy ladder placement, falls from 8 feet cause serious injuries. If you don’t have a helper for lifting beams and holding rafters, hire at least day labor for those tasks.
Contracting out the structural and roofing portions while DIYing the decking and finishing work is a common hybrid approach. A framing crew can set posts, beams, rafters, and sheathing in two days: the homeowner then handles decking installation, staining, and trim. This splits cost while keeping the complex work, and liability, with professionals. Remodeling tutorials and contractor advice often emphasize this middle path for projects that straddle the DIY line.
Cost is the other driver. A contractor-built covered deck runs $50 to $90 per square foot depending on materials and regional labor rates. A 200-square-foot deck lands between $10,000 and $18,000. DIYing the same project cuts that to $25 to $45 per square foot in materials, $5,000 to $9,000, but adds significant sweat equity. If the project requires structural corrections to the house (rotted rim joists, insufficient wall studs for ledger attachment), professional assessment is non-negotiable. Bolting a ledger to compromised framing is a lawsuit waiting to happen.
One often-missed consideration: insurance. Homeowner’s policies may not cover injuries to unpaid helpers during DIY construction. If a friend falls off a ladder while helping with rafters, medical bills and liability can land on the homeowner. Contractors carry liability and workers’ comp insurance for exactly this reason. If you’re uncomfortable with that risk, hiring out the high-risk portions, roof framing, anything above 10 feet, is worth the cost.
Conclusion
A covered deck attached to the house delivers year-round outdoor space, but it’s not a casual weekend project. Proper attachment, load-bearing design, and weather-tight flashing separate a durable structure from a maintenance nightmare. Homeowners comfortable with permits, post footings, and rafter layout can tackle this as an advanced DIY build, especially if help is available for beam setting and roofing. Those less certain about structural work or local code nuances should bring in a contractor for framing and roofing, then finish the details themselves.